Monday, September 26, 2011

Vroom vroom!

Today I was naughty.  (O . o) I drove myself to get my blood taken for my coumadin testing.  I'm only a week away from my 6 week check up where I'll be cleared to drive officially.  It was such a freeing moment.  In the past 3+ months, it was only the 3rd time I've driven.  Being both confined to the house and chairs has been rather frustrating as of late.  My body has become very irritable.  The best way to describe it, is like having restless leg syndrome, but covering the entire backside of my body.  Some days I almost want to just crawl out of my skin!!  So yea, getting out, driving, being Miss Independent if even for just an hour or so felt great.

In other news, as mentioned above a bit, next week is a big week.  I go on Tuesday for my 6 week post-op check up.  A few of my restrictions will be lifted, such as the most important one (aside from driving!)...weight bearing!  I had a restriction of only using 50% of my weight on my newest hip.  I had the same restrictions last week, but there's something about this one that has made it so hard this time around.  All I wanna do is be free! Ha!  I admit it, I've cheated.  I guess when you don't feel excruciating pain anymore it pretty much just makes you wanna get up and go.  Back to next week, Thursday I'll be headed back to physical therapy at least twice a week.  Yikes!  I'm excited and nervous all at the same time!  I'm excited, because I know it's going to make me stronger and make it possible for me to get off of all walking aids period.  Then I'm nervous and scared over all the grueling work they're going to put me through.  Eh, it's be ok...i've dealt with pain for 18 years that was far worse than anything they're going to throw at me!

And finally.  As I was driving home this morning, came across a short, but beautiful song by Eddie Vedder, "Longing to Belong".


Saturday, September 24, 2011

Time flies when you're having fun..

...or in my case, doing nothing.  I can't believe I've been missing for a month!  Well, I kind of can.  I know that in the past I'm well known for abandoning my blog  for months at a time, but I was on a roll!  The last thing I talked about was sitting in the hospital, with a newly wrapped up leg from surgery, and had just experienced my first earthquake...right after waking up from surgery.  How fun was THAT? Ha!  I also mentioned that Hurricane Irene was on her way towards us.  I cannot believe I never got back to talk about that experience.  The rain started early, and progressively got harder throughout the day.  Somewhere around 6pm we lost power.  It got darker, it got windier, it got scarier.  See, we live down a little dirt road, in the WOODS.  Somehow I don't think that the words "woods" and "hurricane" sound too good in the same sentence.  Once night had fallen, the sounds of snapping branches and falling trees became quite a scary ordeal.  We had no idea if any of those trees would have been headed for our house.  The flashes of lightening & transformers blowing however created beautiful lighting throughout the night.  I did get some sleep, however not very much.  Kinda hard to sleep wondering if a tree is gonna fall on your head.  So the night went on, and by morning it was a beautiful day.  The sun came out, the birds and bugs sang their hearts out.  Amazingly we had absolutely no damage to our house, cars, or heads.


Other than that, these last 4 weeks have been rather uneventful.  I had my staples taken out at 3 weeks post-op just like the first hip.  I could have sworn that this incision wasn't ready to have them out, but turns out that it looks better than the first, and the long run will probably be nearly invisible.  Getting around lately has been hard.  Not in the way you think though.  One may think that i say that because it's been tougher, that maybe I've been more sore..but no, that's not it at all.  It's because I'm ready to GO!  I want to get rid of the walker and be free.  I'm feeling so much stronger at this point compared to last time.  The arthritis pain is gone and it feels wonderful.  I still get muscle aches and back aches, but that will all fade in time.  Here in about a week and a half though, I will be officially free of the walker, and can begin physical therapy to start building up the muscles and strengthening them.  I can't wait!  I know it's gonna kick my behind, but I also know that it's going to be a great thing. 


Til next time my loves! <3

Monday, September 19, 2011

Autumn Forest


The days are getting cooler, the sun is setting earlier, sweaters, jackets, and boots are coming out, and hot cocoa lingers on our lips. You know what that means don't you? Oh yea...fall is in the air!!! I absolutely love fall and the colors that come with it. For the past week I've been brainstorming a look full of deep reds, oranges, yellow, golds, and even a hint of purple. Today I finally brought them all together for one amazing look...Autumn Forest. I have to say, that there is something about this look that I have fallen head over heels for. I'd have to say that if I had to choose my 3 favorite looks I've ever done, this one would be in there somewhere. Ok ok ok, enough chit chat...on to the details and fun so you, too, can create this look at home. As always - remember our favorite word....BLEND! :)
~~~~~
1. NAKEY FACE!
(From now on, when you see the words "Nakey Face", know that it means that I've already applied foundation, concealer, and powder. Oh, and also brows most of the time!)


2. Prime the entire lid & under the eye with either some sort of white liner or eye primer. Right now I use a simple white liner by NYC. I've seen rave reviews over NYX Jumbo Eye Pencil in Milk, so I'm hoping to get & try that soon!


3. Using the red (II-8 - palettes below!) from 88 Coastal Scents Ultra-Shimmer palette & and a thin angled brush (#3), outline the center of the eye where you can feel the top of your eye socket. I then winged it out a bit knowing I was going to use red there as well, and also about 1/3 the way under my eye.


4. Using the same thin angled brush, I just smooshed the color up a little fading it into the white. Nothing fancy. Then took a fluffy brush (#5) and just went over the area over and over until it began to fade seamlessly. I didn't make it super perfect here because I knew I'd be going over it with other colors soon!


5. I then took from the 88 CS palette (non-shimmer), a peachy orange (I2), and blended it into the inner crease of red. I blended it until it faded up towards the eyebrow leaving a bit of white showing. After that I used the same orange, but in the shimmer palette (II2) and went over that to give it the shine. Also use this under the eye in the center.


6. From the 88 CS palette I used a mustard yellow (a bit of both B3 & 4), and swept it above the red in the outter corner and into the orange making sure to blend it well where it met the orange, and blend it well up into the white below the brow. I followed it up doing the same with the shimmery match in the 88 Ultra Shimmer palette (BB-3). Do the same under the eye on the inner 1/3 area.


7. Going back to the original red from step #3, I used a fluffy brush (started with #6 for applying then went to #5 for blending) and darkened up the outter corners, blending into both the orange and yellow, as well as under the eye (outter 1/3).


8. Adding some depth, I used a combo of a deep brown/burgundy (shimmer palette color KK-7) & a deep purple (shimmer HH-7). I used a short crease brush (#4) to add the color kinda in the middle of the red. Basically covering it, but leaving some red peaking out around the edges.


9. Here I used the crease brush and used a white by ELF (AAA-1). I applied it under the brows by pressing the color there instead of brushing it. Then used a vertical sweep to lightly make the transition from the white into the color seamless. After that I used gold (shimmer palette BB-5), on the eye lid from the lash line to the crease using a sponge tip applicator. Then BACK to the crease brush and applied the shimmer yellow from above to the inner corners of the eye.


10. Use any black liner of your choosing and keep it super close to the lash line with maybe a smidge of winging if you like. I also used it in the water line.


11. Curl & Mascara!!

12. For the lips I used a Burt's Bees tinted balm. It's a cranberry color, and very sheer, so I went over it with a random deep purplish color I had and went over it again with the Burt's Bees to get a cranberry-ish color.


And there you have it!!! A beautiful fall look!


Products used:

1. Eyes
     a. Coastal Scents 88 Palette
     b. Coastal Scents 88 Ultra Shimmer Palette
     c. ELF "The Beauty Encyclopedia"
     d. Maybelline Colossal Volume Mascara

2. Lips
     a. Burt's Bees tinted lip balm
     b. random burgundy/purple lip stick


Thursday, September 15, 2011

Bird Of Paradise

(Created 9.10.10)
One of the first step-by-step looks I did. This look is called "Bird of Paradise". When I lived in Florida, my roommate introduced me to this book by make-up artist Kevin Aucoin called, "Face Foward". It is an excellent book with some very fun and funky looks, as well as some very simplistic yet gorgeous looks in it. I decided to try out this one and see how well I could re-create the look. Not too bad I say! :)


***The numbers in parenthesis can be seen in the palette photo at the bottom preceeding the "Products Used" section.***


1. Set up your face with foundation, concealer, & powder matching your skin tone.


2. Next use a minty green (#1) and sweep it on the lid from the lash line most of the way up the towards the eyebrows.

3. Using a darker deep green (#2), add some dimension by darkening the outter edges and sweeping it under the eyes. Make sure on the top lid to blend it in well to the Mint Green.

4. Using an orange shadow (#4), fill in the eyebrow. Extend past the outer edge, blend down into the green, and also extend the inner corners down the side of the nose a bit. Using an even darker green (#3), grey, or black, add a bit of a shadow by sweeping the color underneath of the outer edges of the eye.

5. No liner, add mascara.

6. The next step was super fun. You can do this with either a navy blue eye shadow and/or eye liner. I used a bit of both. First I outlined my lips with the liner to give it a strong clean shape.

7. Then I filled in the lip with the same liner. After that I used a navy eye shadow and went over the liner, then added a bit of a shimmer turquoise over that.

8. Follow up with clear gloss & your're all done!! Super simple and fun for a crazy night out if you're bold enough ;)

Products Used:

Eyes:
1. Sephora palette shown above. Colors used are highlighted and numbered for reference.
~mint green, medium green, forest green, orange

2. Maybelline Great Lash mascara


Lips:
1. L'oreal eyeliner in navy blue

2. L'oreal H.I.P. eye shadow duo in matte navy/shimmery turquoise.


Wednesday, September 14, 2011

State Flower Look: Alabama ~ Camellia

Last September I decided to take on all 50 of the United States of America. Well, their flowers at least. In make-up. I was trying to find something creative to recreate and thought how fun it could be to translate the flowers into looks. Most of the time they just involve the eyes, but occasionally i'll work it into the lips as well. I started out from the beginning and did Alabama's Camellia. Really pretty soft and pink with a touch of green for the stem on t
he bottom outer corner. I haven't done as many as I'd like to, but hopefully I can get going again soon! I believe the last I did was for Connecticut, so definitely a ways to go before I reach #50! Then on top of it I get distracted easily and find something new to create. Also,
when I started these I was using a Sephora palette. It's pretty good for starting, lots of colors but they take a lot of applying to get a strong pigment on the lid. I'm now working with Coastal Scents which I really like, but want more than anything to get some sort of eyelid primer to really help the colors POP! Anywhoo - enough rambling and on to the look! Oh, and forgive my step skipping in some tutorials. When I first started doing them, I'd get ahead of myself and was so used to just doing my makeup for the day that I would forget to take pics between steps - lol.

~~~~~

Start off with your usual foundation, concealer, & powder. From there I used a soft/
medium shade of pink on the cheeks, and ELF's white shadow from their "Beauty Encyclopedia"
on the brow bone.
Then take a medium pink that's close to the photo of the flower and using a spon

ge tip applicator press the color onto the eyelid from the lashline up to the crease. Using a fluffy eyeshadow brush, pick up more color and blend it from the crease and into the white. Try and blend until fade from white to pink is seamless. Then using a smaller angled brush, line the lower lash line with pink about 3/4 across from the inside towards the outer, then use a green shadow to place on the outer 1/4 of the lower lash line.
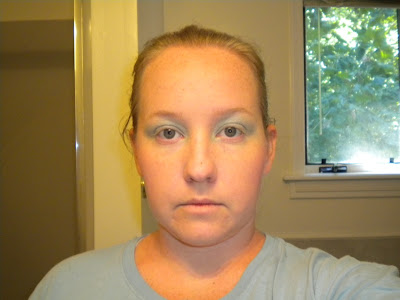
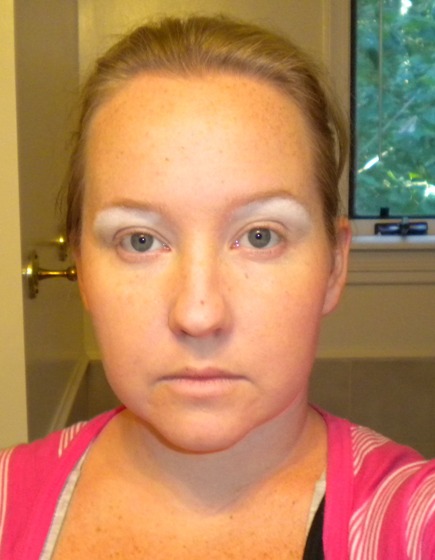
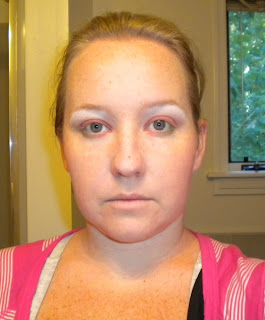
Here I kept it simple and didn't use liner, only a light enhancement of the brows, then curled lashes a bit and threw on some mascara.
Up close


Added a coral lip that I believe is by Mary Kay and topped with clear gloss.
And there ya have it!


Products Used:

Eyes: Sephora 50 color palette - medium pink & green shadows
Maybelline Great Lash Mascara

Cheeks: Sephora Palette - coral blush

Lips: MaryKay Coral Lipstick & random clear gloss

In the beginning

ello all! I decided to start this as a companion to my Facebook page found HERE. Instead of videos (I really dislike my voice!) - I do step by step photo tutorials of the looks I come up with. I have quite a few looks already so slowly but surely I'll be posting them up. Try to get a few in a day until I get all caught up! Hope you enjoy and are inspired and come back for more!! For a quickie - I did my nails today. I'm SO not good at keeping up with my nails, so I rarely do them...but I feel good this morning so I pulled out a French mani kit by ELF.


Related Posts Plugin for WordPress, Blogger...